引言
在 Spring Boot 中,其核心设计理念是对配置信息的管理采用约定优于配置。SpringBoot的配置⽂件主要是为了解决硬编码带来的问题,把可能会发⽣改变的信息,放在⼀个集中的地⽅,当我们启动某个程序时, 应⽤程序从配置⽂件中读取数据,并加载运⾏。
配置文件的种类
propertiesyaml或yml(用的多)
配置文件与 Profile
Profile 本质上代表一种用于组织配置信息的维度,在不同场景下可以代表不同的含义。例如,如果 Profile 代表的是一种状态,我们可以使用 open、halfopen、close 等值来分别代表全开、半开和关闭等。再比如系统需要设置一系列的模板,每个模板中保存着一系列配置项,那么也可以针对这些模板分别创建 Profile。这里的状态或模版的定义完全由开发人员自主设计,我们可以根据需要自定义各种 Profile,这就是 Profile 的基本含义。
另一方面,为了达到集中化管理的目的,Spring Boot 对配置文件的命名也做了一定的约定,分别使用 label 和 profile 概念来指定配置信息的版本以及运行环境,其中 label 表示配置版本控制信息,而 profile 则用来指定该配置文件所对应的环境。在 Spring Boot 中,配置文件同时支持 .properties 和 .yml 两种文件格式,结合 label 和 profile 概念,如下所示的配置文件命名都是常见和合法的:
/{application}.yml
/{application}-{profile}.yml
/{label}/{application}-{profile}.yml
/{application}-{profile}.properties
/{label}/{application}-{profile}.properties
配置文件的加载顺序
通过前面的示例,我们看到可以把配置文件保存在多个路径,而这些路径在加载配置文件时具有一定的顺序。Spring Boot 在启动时会扫描以下位置的 application.properties 或者 application.yml 文件作为全局配置文件:
–file:./config/
–file:./
–classpath:/config/
–classpath:/
以下是按照优先级从高到低的顺序,如下所示:
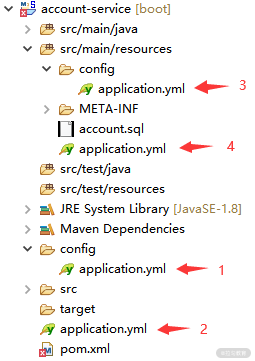
Spring Boot 会全部扫描上图中的这四个位置,扫描规则是高优先级配置内容会覆盖低优先级配置内容。而如果高优先级的配置文件中存在与低优先级配置文件不冲突的属性,则会形成一种互补配置,也就是说会整合所有不冲突的属性。
配置项
该章节参考 https://blog.csdn.net/dream_ready/article/details/134278773
配置对象
在
application.yml定义yamlstudent: id: 1 name: Java age: 18使用:
javaimport lombok.Data; import org.springframework.boot.context.properties.ConfigurationProperties; import org.springframework.stereotype.Component; // 下面这个注解起到读取配置文件对应内容并赋值给该类的操作 @ConfigurationProperties(prefix = "student") @Component @Data public class Student { private int id; private String name; private int age; }
配置集合
在
application.yml定义:后一定要加空格,如果不加空格,这部分内容会变成一个整体,统一赋值给对应属性yamldbtypes: name: - mysql - sqlserver - db2使用:
java@Component @ConfigurationProperties("dbtypes") @Data public class ListConfig { private List<String> name; // 也可以使用数组来接收 // private String[] name; }
配置Map
在
application.yml定义:yamlmaptypes: map: k1: kk1 k2: kk2 k3: kk3使用:
java@Component @ConfigurationProperties("maptypes") @Data public class MapConfig { private HashMap<String,String> map; }
单独名称的配置文件
使用 @PropertySources 注解。
@Component
@ConfigurationProperties(prefix = "springcss.order")
@PropertySource(value = "classpath:application.properties")
public class SpringCssConfig {

}
引入多个配置文件,这时候用到的是 @PropertySources 注解,使用方式如下所示:
@PropertySources({
        @PropertySource("classpath:application.properties "),
        @PropertySource("classpath:redis.properties"),
        @PropertySource("classpath:mq.properties")
})

public class SpringCssConfig {
配置项引用
引用前面出现过的配置项:通过
${}占位符引用yamlmyapplication.name : ${spring.application.name}引用配置文件中的其他配置项内容:通过
${}占位符引用yamlsystem.name=springcss system.domain=health system.description=The system ${name} is used for ${domain}.动态获取与系统构建过程相关的信息(使用Maven构建):
yamlinfo: app: encoding: @project.build.sourceEncoding@ java: source: @java.version@ target: @java.version@
配置项使用
有两种方式:
像前面列举的
@ConfigurationProperties注入一个单独配置项:使用 @Value 注解来注入配置项内容:
java@Component public class SpringCssConfig { @Value("${springcss.order.point}") private int point; }
覆写内置的配置类
可以使用配置文件、Groovy 脚本以及 Java 代码。
激活某一个profile
两种方式均可激活:
在
application.yml中指定:yamlspring: profiles: active: test允许一次激活多个profile,比如:
spring.profiles.active: prod, myprofile1, myprofile2运行时激活:
shelljava –jar my-demo-1.0.0.jar --spring.profiles.active=prod
代码控制与Profile
在 Spring Boot 中,Profile 这一概念的应用场景还包括动态控制代码执行流程。SpringBoot 提供了一个@Profile注解。
@Configuration
public class DataSourceConfig {
    @Bean
    @Profile("dev")
    public DataSource devDataSource() {
        //创建 dev 环境下的 DataSource
    }

    @Bean()
    @Profile("prod")
    public DataSource prodDataSource(){
        //创建 prod 环境下的 DataSource
    }
}
在日常开发过程中,一个常见的需求是根据不同的运行环境初始化数据,常见的做法是独立执行一段代码或脚本。基于 @Profile 注解,我们就可以将这一过程包含在代码中并做到自动化,如下所示:
@Profile("dev")
@Configuration
public class DevDataInitConfig {

  @Bean
  public CommandLineRunner dataInit() {
    return new CommandLineRunner() {
      @Override
      public void run(String... args) throws Exception {
        //执行 Dev 环境的数据初始化
    };
}
一些实用的配置片断
指定服务暴露的端口地址
yamlserver: port: 8080数据源的设置(JPA为例):
yamlspring: jpa: hibernate: ddl-auto: create show-sql: true设置日志级别和对象(设置了系统的全局日志级别为 WARN,而针对自定义的
com.yeyouluo.demo包下的日志则将其级别调整到 INFO):shelllogging.level.root=WARN logging.level.com.yeyouluo.demo=INFO